I used to read lengthy and complex articles in the PDF format. Despite the abundance of PDF exporting options, the resulting files often appear unappealing. However, there is a solution. With the pandoc tool and the xelatex backend, you can transform Markdown files into aesthetically pleasing PDFs. In this tutorial, I will guide you through the steps of using pandoc with xelatex and share the lessons I’ve learned.
Installation
Ubuntu users can install the package texlive-xetex and pandoc, In macOS, I recommend a minimal installation:
brew install librsvg pandoc
brew install --cask basictex
sudo tlmgr update --self
sudo tlmgr update --all
for pkg in texliveonfly xelatex adjustbox tcolorbox collectbox ucs environ \
  trimspaces titling enumitem rsfs xecjk fvextra svg transparent; do
  sudo tlmgr install $pkg
done
The library librsvg is required to support SVG images.
Verify the installation by converting a simple markdown file.
echo "# Hello World" > test.md
pandoc --pdf-engine=xelatex -i test.md -o test.pdf
Tips
In LaTeX, the document class serves as the template for the basic page styles.
I’m a fan of koma-script, and I will choose between scrreprt and scrbook depending whether the file to create is more like a report or a book. I recommend try them and the standard classes like report and book, then choose the one that best suites your preferences.
To customize the document class in pandoc, simply set the variable documentclass. Other variables are available for controlling the LaTeX style. I use some of them to define my default style.
DOCUMENTCLASS="${DOCUMENTCLASS:-scrreprt}"
MAINFONT="${MAINFONT:-Helvetica}"
MONOFONT="${MONOFONT:-Cartograph CF}"

pandoc --pdf-engine=xelatex \
  --variable fontsize=12pt \
  --variable linestretch=1.5 \
  --variable geometry=a4paper \
  --variable documentclass="${DOCUMENTCLASS}" \
  --variable mainfont="${MAINFONT}" \
  --variable monofont="${MONOFONT}" \
  -i test.md -o test.pdf
Gotchas
CJK
CJK is a collective term for the Chinese, Japanese, and Korean languages. When CJKmainfont is set, pandoc handles CJK characters with the xecjk package.
pandoc --variable CJKmainfont="Noto Serif CJK SC" ...
My recommendation is to only set CJKmainfont when needed to avoid messing up the quotation marks display. Where the article contains a mixture of English and Asian characters resulting in strange looking quotation marks '"“”‘’, consider trying the following solution.
- Create a file
cjk.latexto force English quotation marks.% cjk.tex \AtBeginDocument{% \XeTeXcharclass`^^^^2019=0 } - Include this file via the pandoc argument
-Hsuch aspandoc -H cjk.tex.
The figure below shows the results from the same markdown file on my MacBook. However, when I test this in Ubuntu, it seems there are no such issues.
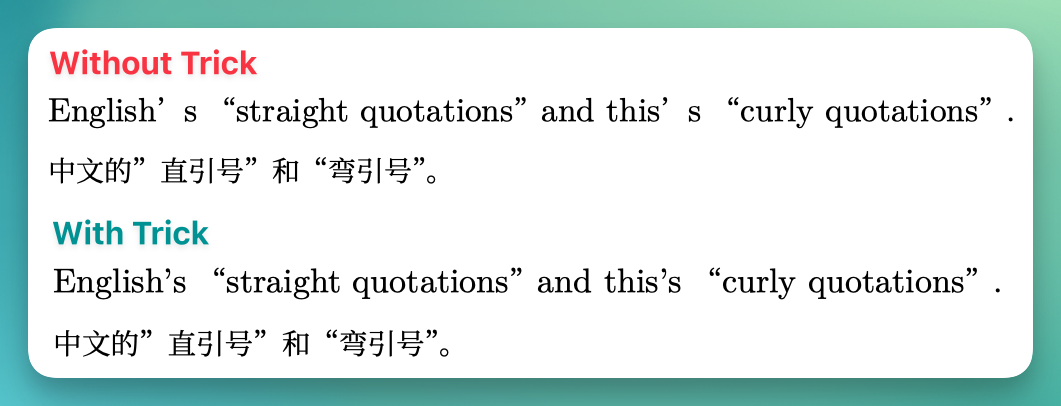
This is the input markdown file used in the example.
English's "straight quotations" and this’s “curly quotations”.

中文的"直引号"和“弯引号”。
Code Block Syntax Highlight
Pandoc does not wrap lines in code blocks by default. It truncated the lines which are too long to fit on the page.
To solve the problem mentioned above, I followed a solution on GitHub suggested by jannick0. It involves the creation of a file that contains the LaTeX snippets below. These snippets can then be included by using the pandoc argument -H highlighting.tex. Additionally, I added a border around the code block.
highlighting.tex
% use this file via pandoc -H highlighting.tex
\usepackage{fvextra}
\DefineVerbatimEnvironment{Highlighting}{Verbatim}{breaklines,breaknonspaceingroup,breakanywhere,frame=single,framesep=8pt,rulecolor=\color[HTML]{aaaaaa},commandchars=\\\{\}}
As I replied in the thread, this solution does not work for code blocks without setting a language. I use a Lua filter to set the language of these code blocks to “text”. To run the filter, save it in a file, say highlighting.lua, and invoke pandoc with --lua-filter=highlighting.lua
highlighting.lua
function CodeBlock(el)
  if #el.classes == 0 then
   el.classes[1] = 'text'
  end
  return el
end

return {{CodeBlock = CodeBlock}}
Disable Figures Floating
The last issue to address is the floating of figures in LaTeX, which moves the images to avoid large blank space in pages. While LaTeX attempts to place figures in appropriate locations, authors may refer to them as “above” or “below” in the markdown files. This can be confusing for readers who may find that the referenced chart or diagram is actually on the following page in the PDF file.
To solve the issue, simply disable floating figures. Create a file disable-floating.tex and invoke pandoc with arguments -H disable-floating.tex.
disable-floating.tex
% https://stackoverflow.com/a/58840456/667158
\usepackage{float}
\let\origfigure\figure
\let\endorigfigure\endfigure
\renewenvironment{figure}[1][2] {
  \expandafter\origfigure\expandafter[H]
} {
  \endorigfigure
}
Putting It All Together
See the repo doitian/pandoc-ide.